Tuesday, September 20, 2011

New Zealand WhiteBait Patties Recipe


 There are not many Kiwis who dont get this far away look of delight when you mention hot whitebait patties. Its a well loved treat and a seasonal , almost spiritual experience. White baiting is a culture .With people along the coast staking out their favourite spots , setting up their little huts and nets and waiting for the catch. Its a social thing with folk knowing each other from white baiting over the years.


Here in New Zealand , whitebait are mainly caught in the lower reaches of the rivers using small open-mouthed hand-held nets although in some parts of the country where whitebait are more plentiful, larger (but not very large) set nets may be used adjacent to river banks. Whitebaiters constantly attend the nets in order to lift them as soon as a shoal enters the net. Otherwise the whitebait quickly swim back out of the net. There is a fair amount of sitting and waiting with many whitebaiters setting up little camps alongside their nets.

Typically, the small nets have a long pole attached so that the whitebaiter can stand on the river bank and scoop the net forward and out of the water when whitebait are seen to enter it. The larger nets may be set into a platform extending into the river from the bank and various forms of apparatus used to lift the net.

Whitebaiting in New Zealand is a seasonal activity with a fixed and limited period enforced during the period that the whitebait normally migrate up-river. The strict control over net sizes and rules against blocking the river to channel the fish into the net permit sufficient quantity of whitebait to reach the adult habitat and maintain stock levels. The whitebait themselves are very sensitive to objects in the river and are adept at dodging the nets.

There are many purists who swear by one recipe or another but it all depends on what you like really. White bait is costly with a kilogram selling for $120 NZ.


Greg and I have lovely memories of stopping for whitebait patties  on a long drive back from the North Island.Here is one of the many recipes there are for great whitebait patties. Its best washed down with icy cold Kiwi beer.


Ingredients:
  • 3 eggs beaten
  • 1/2 cup milk
  • 3/4 cup flour
  • 1/4 teaspoon salt
  • 1 teaspoon baking powder
  • 500 g whitebait
  • 2 tablespoons light vegetable oil (for frying) or 2 tablespoons butter (for frying) or olive oil


  1. Beat the eggs in a large bowl, then mix in the milk.
  2. Season with salt and pepper to taste.
  3. Lightly beat through the flour & baking powder to ensure there are no lumps. Add the flour slowly - the mixture should be thick and  runny
  4. In a colander, rinse the whitebait and pick out any river stones or other debris.
  5. Drain, and mix into the egg mixture until well combined.
  6. Heat a frying pan on medium-high heat, and once heated, add the butter/olive oil.
  7. Drop in dessert-spoonfuls of the whitebait mixture, and cook until the pattie is set ( starts to go golden on the underside). The whitebait will normally have gone white at this stage
    .
  8. Turn, and cook on the other side until golden.
  9. Keep warm in the oven until ready to serve, in my house they get eaten as fast as they are cooked!

Wednesday, September 7, 2011

New Zealand's beautiful Paua shells...gems from the icy seas.

The New Zealand Paua Shell is a beautiful natural shell ( this shell has not been dyed or coloured ) that occurs in the icy cold waters here in New Zealand. It yields precious blue pearls in the same hues as its shell.Each blue pearl is unique and often has its own serial number.

With natural swirls of blue , greens, purples and even pinks- this shell has long been used in the making of fine jewelry and art work. The Paua shell often features in the eyes of natural Maori carvings.


The shells we sell  have been cleaned and buffed. Other than that it is in its natural state. There is no odour to the shell and its ready for you to use in your art or crafts.It is truly prized for jewelry making or in art and sculpture, gourd craft or pottery.

The ones we are selling are the small shell...about 5"-6" big...


we are able to get larger ones but they cost more..- message us if you are interested.


This shell can be used whole or cut into pieces as required. The shell is strong but you are able to drill though it..( ie its not too thick)


The listing on our Etsy site  is for one shell only - please let us know if you would like more. If you do not have an Etsy account message us for payment info. The shell in the picture is a the type of shell you will be getting ( not the actual shell) we will choose a beautiful one for you.


The Paua shell is gathered and cleaned near to where we live - in the coast of Kaikoura

The shells can be bought here.
http://www.etsy.com/listing/74449297/new-zealand-paua-abalone-whole-shell-for

We have had awesome feedback on the Paua shells we have sold -here is a few comments

"GORGEOUS!!! ... its going right on my specimen shelf! ... i had a wonderful experience with this fellow etsy member ... would most definitely buy from this shop again and again! ... thank you very much!!! :0)"

"I have never dealt with a more friendly and helpful vendor. If anyone is afraid to deal with someone so far away, don't be: Tammy is wonderful to work with. Tell her what you want, and she'll make it happen. I actually HOPE there will be things I need in the future so I can work with her again! Thank you so very much!"


We think this would make a awesome Christmas gift or anytime gift for someone who loves New Zealand or the sea or collect such treasures!!
"

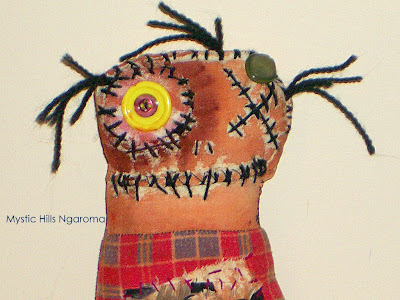
Muddy Buddy The monster Doll

Ugly Muddy Buddy looks like he has been playing with the cows again....He just has to find a way to get his daily glass of milk!!


Muddy Buddy is a grungy monster art doll- made with upcycled fabrics , paint and buttons and wool. He is 8" tall or 20 cm!

Do you need some muddy footprints through your home?


I love making these monster dolls simply as it allows me to design and create with freedom and whimsy...I can stain fabric , position eyes in weird places...add buttons and notions from anywhere and best of all reuse and upcycle or repurpose fabrics and finds from charity shops and flea markets..Muddy Buddy can be seen and purchased from the link below.

http://www.etsy.com/listing/79595119/grungy-monster-art-doll-ugly-muddy-buddy

Olive Oil in cooking and Baking


We have recently been trying to work on eating healthy and the onset of the warm balmy Spring days here in new Zealand seem the best time to start. We have been reading a book called the Pink Ribbon Diet by Mary Flynn and Nancy Verde Barr. Besides a weight loss book , the diet also promotes the lowering of the risk of breast cancer. It was a surprise for me to read that many women under going chemotherapy also put on alot of weight . This was not the standard picture of someone battling cancer.


One of the things the diet promotes is the use of olive oil in cooking and baking. Taking its cue from Mediterranean diet which tended to be rich in vegetables , whole grains and olive oil , the writers linked this to lowered risk of a number of cancers.


The diet or new way of eating seemed very do-able for us. We both love olive oil and lived in a area where locally grown olive oil was plentiful. We are able to buy direct from the grower , filling our old wine bottles with extra virgin olive oil. It is a delight to eat, especially with pan fried peppers and eggplant. I have found using it on warm toast in the morning also tended to make me feel satisfied and fuller faster.

We are experimenting with using it to bake as home baking cakes , cookies and pies are a regular thing for us. I have hunted thorugh olive oil sites and  am posting a table showing how olive oil can be used instead of butter or margerine. The reviews are mixed- some people raving about light pastry , while others citing the taste of olive oil dominated the baking...we have yet to try it our but I thought a batch of home made date scones may be a great start...so for anyone interested here is the table - one of many we found.

Butter/Margarine Olive Oil
1 teaspoon 3/4 teaspoon
1 tablespoon 2 1/4 teaspoons
1/4 cup 3 tablespoons
1/3 cup 1/4 cup
1/2 cup 1/4 cup + 2 tablespoons
2/3 cup 1/2 cup
3/4 cup 1/2 cup + 1 tablespoon
1 cup 3/4 cup

I would love to hear for anyone else who is using  olive oil instead of butter for baking and what you have found out...enjoy all.

Tuesday, August 30, 2011

Altered art Tins

I am a hoarder. Greg calls me "his little Weka " cos I love to save stuff...bits of pretty paper, trims, tiny treasures etc . It is hard to find something to do with them but I cant bear to thrown them away. Lately I have been playing with the idea of altered art tins.Inspired by the beautiful work I have seen from other artists online - altered tins have provided me with hours of quiet pleasure as I sit and sift though paper and lace and create. I got these beautiful little tins from the US - Altoid tins are just the right size for altered art -art shrines some folk call them. These tiny mint tins are hinged and perfect for creating little dioramas or a collage of stuff that inspires.

My supplies as I work

Some artists paint and then distress their tins , blowtorch off the paintwork or sandpaper it off. I wanted to keep it simple - so I simply added a layer of paper or card to cover the tin tops and bottom . I used a lovely trim that my friend Belinda from the US sent me. I have used old birthday cars and Christmas cards for some if the images. layering them to give a 3D effect. This was done with thick double sided tape. I also used little charms and stickers when necessary.

These are two of my first attempts...and one I am still working on...
Lid of the tin with vintage gift wrap paper in old roses , layered with card and stick on velvet sticker and charm. The lovely oval was a plastic gift  in a cereal box with local rugby players. I saved it - covered it with my sticker and added a lace trim

Revealing the inside of the tin...My favourite things...dolls and bears...included a tiny minature teddy beat


Old Christmas card I love , cut and layered with images from a old teddy bear calendar again  in layers

Inside lid of tin with layer images from stickker with vintage doll, father from my chicken Ethel


Cover of the tin with a NZ artist work on a mini gift tag as the covere


Inside of my little Fairy tin


inside lid of tin with lace and layers images.

Added a little brass dragon fly charm


Another close up of tin with fairy and flowers..all taken from old greeting cards.


Work in progress - my little tin with vintage images.


Still working on the altered tin - two vintage pictures. The one on the left is an original picture.I tend to form stories in my head as I work on these. 

Using an old 1949 newspaper to collect pictures and images to add to a mini album in the tin
I hope you have enjoyed my creations- they were great fun to make and a wonderful way to use up saved treasures....these are the first I have made and I am looking forward to making more. Leave a comment and let me know what you think....

Sunday, August 28, 2011

ANZAC Buscuits Recipe

This is another favourite Kiwi recipe - Anzac Biscuits. These simple biscuits have a much loved history as they are linked to the  New Zealand and Australian soldiers from the first World War.

 New Zealand and Australia share a tradition of Anzac Biscuits. Both countries claim to have invented them, but Anzac Biscuits are similar to many other older biscuit recipes that are designed to produce crisp, hard and nutritious biscuits that keep well.


One of the food items that women in both countries sent to soldiers during the First World War was a hard, long-keeping biscuit that could survive the journey by sea, and still remain edible. These were known as Soldiers' Biscuits, but after the Gallipoli landings in 1915, they became known as Anzac Biscuits. Soldiers themselves may have made a similar form of biscuit from ingredients they had on hand: water, sugar, rolled oats and flour.
 

The traditional Anzac Biscuit is hard and flat - ideal for dunking in tea and then eating. During the First World War, some soldiers used broken biscuits to make a form of porridge to add some variety to their diet.
Over the years, softer and chewier versions of the biscuit have appeared. There are many recipes for Anzac Biscuits. Common to most is the inclusion of rolled oats, coconut, butter and golden syrup. Eggs almost never feature. This may be because eggs were in short supply during the First World War. Many varieties of biscuit do not have eggs, however, and like Anzac Biscuits rely instead on chemical rising agents such as bicarbonate of soda (baking soda).
 
There are stories of ladies baking these biscuits packed with goodness to send to their men folk fighting in the war- a tradition that still continues to this day. One of the reasons I love this whole story of these biscuits is its typical of the Kiwi simplicity and do-it -yourself way for caring. In times of disasters , its not uncommon for boxes of these biscuits to be made and sent to those in need.I think its due to the fact that these biscuits keep well and are hard crunchy ones- so they ship/post well. I hope you enjoy the recipe and think of the joy of the soldiers as they unpacked parcels from home of ANZAC Biscuits.

 Ingredients:
  • 1 heaped cup of sifted flour
  • 2 level teaspoons baking powder
  • 1 small cup of sugar
  • 1 heaped cup of coconut
  • 1 heaped cup of rolled oats
  • 4 oz/110 gm butter
  • 1 tablespoon golden syrup
  • 2 tablespoons boiling water

Method:
Mix all the dry ingredients well together. Put the butter, golden syrup and water into a saucepan to melt and then add to the mixture. Take spoon fulls of the mixture and roll into balls and press down on a cold greased tray. Bake at 350 F/180 C for 15 to 20 minutes (if you are using a fan-forced oven  then you will need to lower the temperature by up to 10 degrees centigrade and/or adjust the time). Leave to cool on a rack.
 

Sunday, August 21, 2011

Spring Lambs - Early

Come on - somebody feed me!!!
 I love the arrival of the new spring lambs on the farm....the joyful bouncing and skipping out in the field...little bleets and  antics. I find it hard to believe Greg's stories of the horror of a little band of lambs who decide to play up with the farm dogs....it seems these small parcels of fluff can be quite the "patience tester" for both shepherd and dogs....But I will keep my fantasy of sweet innocent lambs. These are some that were born the other day -they were about 2 days old in these photos-  thankfully after the heavy snow we had here and over most of New Zealand. Sadly their mother was not well after giving birth to them and died shortly after dispite efforts to save her. These little orphans are being raised by foster mommies now. I thought some of you would enjoy seeing the pictures...